Conversations are becoming the new platform of habit. User interaction trends have, and will continue to evolve. If you recall the mid-80s trends, it was all about the Desktop. It then evolved into websites in the mid-90s, and to mobile apps in the mid-00s. Today, we see folks spending their time using messaging applications like Skype, WeChat, and WhatsApp to accomplish more.
Bots are interesting. They rely on Natural Language Processing (NLP) to comprehend our users’ intentions and context. There’s no need to build a user interface every time we need an app, instead we can take advantage of various standard channels through Microsoft’s Bot Framework to connect, present, and visualize our services e.g. Skype, Facebook Messenger, Kik, Slack, SMS by Twilio, and even your own custom Channel.
In this post, we will build together a Skype Bot using Microsoft’s Bot Framework and deploy it to an Azure App Service. You can find the bot’s source code on GitHub: https://github.com/codedebate/Samples-Room-Finder-Bot.
Step 1: Let’s agree on the scope of our sample
Finding a meeting room can be a challenge when you are new to a campus, building, or a specific floor. Imagine picking up your phone and asking a Skype bot for directions. How convenient would that be? 🙂
A word of advice: as fancy bots may sound, they should always have a specific purpose and mission. Try to stay away from multi purpose bots.
When building a bot, at minimum you will need the following components:
- Messages Repository: store all bot messages presented to our user. If you decide to hard code them: you will have to re-deploy the bot every time you change a message.
- Knowledge-base Repository: store the knowledge-base articles. In our case, directions to a meeting room are considered articles.
- Web App: this is where you will deploy and host the Bot app.
I will use Azure Table Storage for hosting these repositories. This way we do not have to waste time on building some back office website, but instead use the Storage Explorer to manage them. In real life though, you will have to build a back office website e.g. using ASP.NET MVC, where administrators can manage these messages and settings. Furthermore, the source of the Knowledge-base articles would be some line of business application like Dynamics CRM.
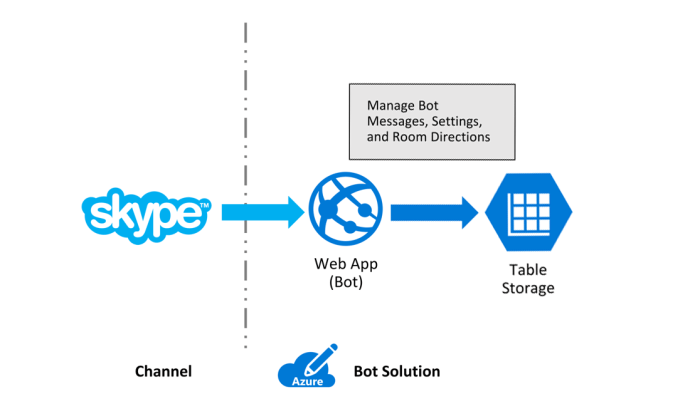
Room Finder Sample Bot
Step 2: Provision our Bot’s resources using Azure
Login to the Azure Portal and create a new Resource Group. I called mine CodeDebate-RoomFinderBot. When done, create both the Storage Account and Web App. I called them: roomfinderbotsample.
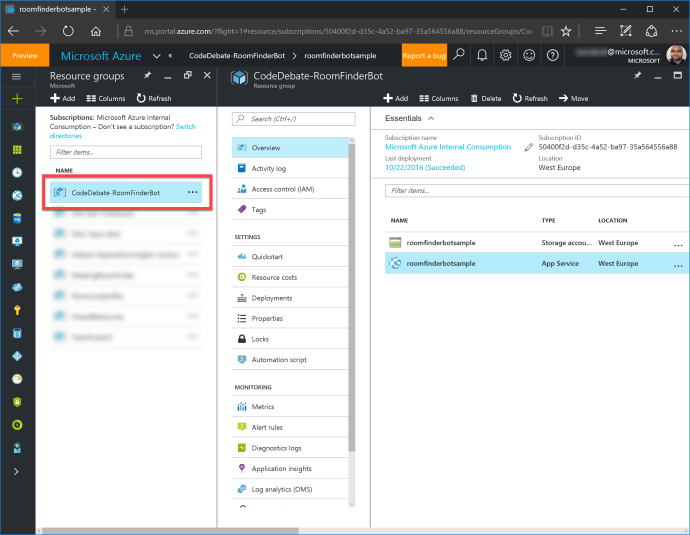
Room Finder Bot Sample Resource Group
Step 3: Create Azure table storage and populate content
To keep things simple, we will use three tables as follows:
- BotMessages to act as the Messages Repository
- RoomDirections to act as the Knowledge-base Repository
- BotSettings to store all the different enumerations and flags we will use for the bot logic
Launch Storage Explorer to create the tables. Make sure you have both Storage Account name and also one of the Storage Account keys at hand. The figure below describes where you can find them.
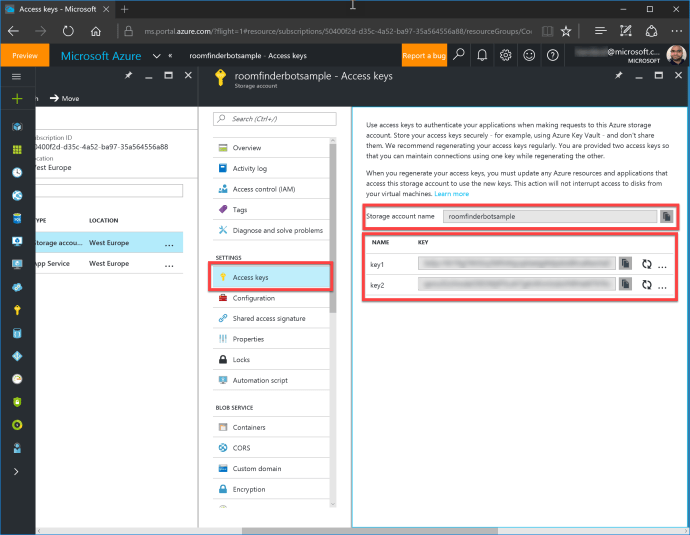
Storage Account Name and Access Keys
Once you are done, use the Storage Explorer to populate the Bot Messages and couple of Meeting Room Directions. You can also use Visual Studio Cloud Explorer to explore the storage account if you are not comfortable with Storage Explorer.
The below screenshot describes the messages I have populated into the BotMessages table. Notice how I used XXXX as a place holder in the strings to replace it later within the bot.
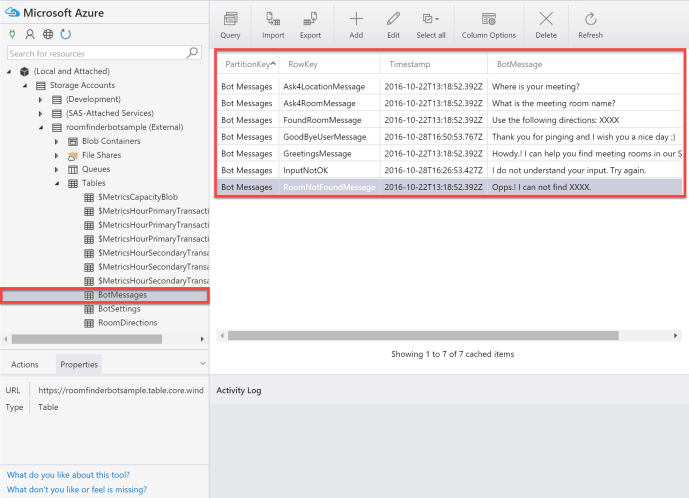
Bot Messages Table
The below screenshot describes the room directions I have populated into the RoomDirections table. Notice how the rooms are partitioned by Location.
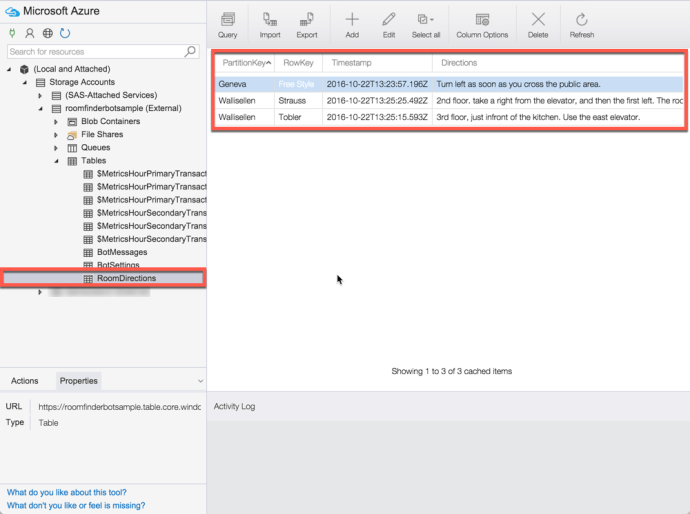
Room Directions Table
The below screenshot describes the settings I have populated into the BotSettings table. Notice that I used it to store the Locations enumeration.
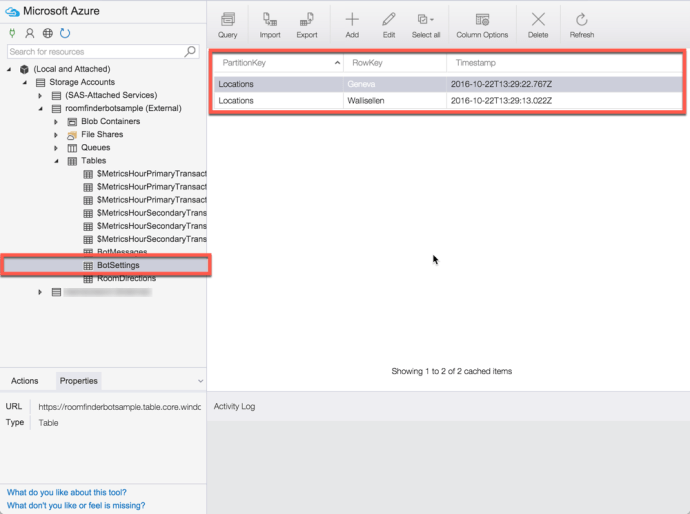
Bot Settings Table
A word of advice: have a read-only REST API ready and cached with the various messages and settings dedicated for the bot. Do not access storage directly.
Step 3: Create the Bot app project
While the Bot app project template is not part of Visual Studio’s installation binaries or updates yet, you can download it from here or use the Bot Builder NuGet library.
Refer to the Getting started with the Connector article to learn more about creating a Bot App project.
Step 4: Connect the Bot to table storage repositories
Since we are using Azure Table Storage, you will have to add the Windows Azure Storage NuGet library to your Bot app project. Next, we need to create the different entity classes required to access the contents in storage, those will have to inherit from the TableEntity class.
Refer to the Starting Azure Platform as a Service (PaaS) Development 101 Series: Lesson 2 of n – Table Storage article to learn more about accessing tables.
Based on our simple and lazy design, we have four Table entities as follows:
- Bot Message
- Partition Key: Type of Message: we used only Bot Messages. You could use System Messages etc. Make them as you need 😉
- Row Key: Message Key
- Bot Message: String used to format the bot message
- Room Directions
- Partition Key: Location of the Room: Wallisellen (Zürich), Vernier (Geneva), etc.
- Row Key: Meeting Room name
- Directions: String used to describe the directions to the meeting room
- Room Location (will be used to create the enumeration of Locations)
- Partition Key: Type of Settings key: we used only Locations for this example.
- Row Key: Location name
Reflecting our description of the entities, below are the 3 definitions:
using Microsoft.WindowsAzure.Storage.Table;

namespace CodeDebate.Samples.RoomFinderBot.Entities
{
    public class BotMessages : TableEntity
    {
        public BotMessages(string typeOfMessage, string botMessageKey, string botMessage)
        {
            PartitionKey = typeOfMessage;
            RowKey = botMessageKey;
            BotMessage = botMessage;
        }

        public BotMessages()
        {
        }

        public string BotMessage { get; set; }
    }
}
using Microsoft.WindowsAzure.Storage.Table;

namespace CodeDebate.Samples.RoomFinderBot.Entities
{
    public class RoomDirections : TableEntity
    {
        public RoomDirections(string location, string meetingRoomName, string directions)
        {
            PartitionKey = location;
            RowKey = meetingRoomName;
            Directions = directions;
        }

        public RoomDirections()
        {
        }

        public string Directions { get; set; }
    }
}
using Microsoft.WindowsAzure.Storage.Table;

namespace CodeDebate.Samples.RoomFinderBot.Entities
{
    public class RoomLocations : TableEntity
    {
        public RoomLocations(string typeOfSettings, string locationName)
        {
            PartitionKey = typeOfSettings;
            RowKey = locationName;
        }

        public RoomLocations()
        {
        }
    }
}
Next, we need to create our storage data access helper. It will contain functions that:
- Access the different bot messages, settings, and enumerations
- Process query for room directions using the meeting room name
Below is our bot’s storage data access helper functions:
using System.Collections.Generic;
using System.Linq;
using CodeDebate.Samples.RoomFinderBot.Entities;
using Microsoft.Azure;
using Microsoft.WindowsAzure.Storage;
using Microsoft.WindowsAzure.Storage.Table;

namespace CodeDebate.Samples.RoomFinderBot.Helpers
{
    public static class StorageDataAccess
    {
        public static string GetBotMessage(string key)
        {
            var storageAccount = CloudStorageAccount.Parse(
                CloudConfigurationManager.GetSetting("StorageConnectionString"));

            var tableClient = storageAccount.CreateCloudTableClient();

            var table = tableClient.GetTableReference("BotMessages");

            var retrieveOperation = TableOperation.Retrieve<BotMessages>("Bot Messages", key);

            var retrievedResult = table.Execute(retrieveOperation);

            return retrievedResult.Result != null ? ((BotMessages) retrievedResult.Result).BotMessage : string.Empty;
        }

        public static string GetRoomDirections(string location, string name)
        {
            var storageAccount = CloudStorageAccount.Parse(
                CloudConfigurationManager.GetSetting("StorageConnectionString"));

            var tableClient = storageAccount.CreateCloudTableClient();

            var table = tableClient.GetTableReference("RoomDirections");

            var retrieveOperation = TableOperation.Retrieve<RoomDirections>(location, name);

            var retrievedResult = table.Execute(retrieveOperation);

            return retrievedResult.Result != null ? ((RoomDirections) retrievedResult.Result).Directions : string.Empty;
        }

        public static List<string> GetListOfLocations()
        {
            var storageAccount = CloudStorageAccount.Parse(
                CloudConfigurationManager.GetSetting("StorageConnectionString"));

            var tableClient = storageAccount.CreateCloudTableClient();

            var table = tableClient.GetTableReference("BotSettings");

            var queryOperation =
                new TableQuery<RoomLocations>().Where(
                    TableQuery.GenerateFilterCondition(
                        "PartitionKey", QueryComparisons.Equal, "Locations"));

            var retrievedResult = table.ExecuteQuery(queryOperation).ToList();

            var locations = retrievedResult.Select(
                retrievedItem => retrievedItem.RowKey).ToList();

            return locations;
        }

        public static List<string> GetListOfRooms(string location)
        {
            var storageAccount = CloudStorageAccount.Parse(
                CloudConfigurationManager.GetSetting("StorageConnectionString"));

            var tableClient = storageAccount.CreateCloudTableClient();

            var table = tableClient.GetTableReference("RoomDirections");

            var queryOperation =
                new TableQuery<RoomLocations>().Where(
                    TableQuery.GenerateFilterCondition(
                        "PartitionKey", QueryComparisons.Equal, location));

            var retrievedResult = table.ExecuteQuery(queryOperation).ToList();

            var rooms = retrievedResult.Select(
                retrievedItem => retrievedItem.RowKey).ToList();

            return rooms;
        }
    }
}
Step 5: Implement the Bot dialogs
Microsoft’s Bot Framework Dialogs introduces a simple way of managing a dialog with your users. While having a conversation using natural language is awesome, I rarely see this case with task specific bots like our sample.
Our bot will use one dialog called RoomFinderDialog. The dialog will have 5 activities between greeting the user; collecting information about the context, and presenting a result.
The below list highlights these 5 activities (steps):
- Greet our user and display our bot’s intentions
- Ask the user for the meeting room location
- Ask the user for the meeting room name
- Display the directions to the meeting room
- Saying goodbye to our user
In addition, you can find below the actual implementation of the RoomFinderDialog.
Notice:
- How I add a prefix to every function with a step number. This makes things easy when you have large dialogs.
- I restart the flow to Step 1 after I finish the whole process execution. Otherwise your user will always be stuck at the last step.
using System;
using System.Threading.Tasks;
using CodeDebate.Samples.RoomFinderBot.Helpers;
using Microsoft.Bot.Builder.Dialogs;
using Microsoft.Bot.Connector;

namespace CodeDebate.Samples.RoomFinderBot.Dialogs
{
    [Serializable]
    public class RoomFinderDialog : IDialog<object>
    {
        private string _roomLocation;
        private string _roomName;

        public async Task StartAsync(IDialogContext context)
        {
            context.Wait(Step01_GreetUserDisplayIntentions);
        }

        public async Task Step01_GreetUserDisplayIntentions(IDialogContext context, IAwaitable<IMessageActivity> result)
        {
            await context.PostAsync(
                StorageDataAccess.GetBotMessage("GreetingsMessage"));

            await Step02_AskUser4RoomLocation(context, result);
        }

        public async Task Step02_AskUser4RoomLocation(IDialogContext context, IAwaitable<IMessageActivity> result)
        {
            await context.PostAsync(
                StorageDataAccess.GetBotMessage("Ask4LocationMessage"));

            PromptDialog.Choice(
                context,
                Step03_AskUser4RoomName,
                StorageDataAccess.GetListOfLocations(),
                string.Empty,
                StorageDataAccess.GetBotMessage("InputNotOK"));
        }

        public async Task Step03_AskUser4RoomName(IDialogContext context, IAwaitable<string> result)
        {
            _roomLocation = result.GetAwaiter().GetResult();

            await context.PostAsync(
                StorageDataAccess.GetBotMessage("Ask4RoomMessage"));

            PromptDialog.Choice(
                context,
                Step04_InformUserOfRoomDirections,
                StorageDataAccess.GetListOfRooms(_roomLocation),
                string.Empty,
                StorageDataAccess.GetBotMessage("InputNotOK"));
        }

        public async Task Step04_InformUserOfRoomDirections(IDialogContext context, IAwaitable<string> result)
        {
            _roomName = result.GetAwaiter().GetResult();

            var directions = StorageDataAccess.GetRoomDirections(_roomLocation, _roomName);

            if (string.IsNullOrEmpty(directions))
                await context.PostAsync(
                    StorageDataAccess.GetBotMessage(
                            "RoomNotFoundMessage").Replace("XXXX", directions));
            else
                await context.PostAsync(
                    StorageDataAccess.GetBotMessage(
                            "FoundRoomMessage").Replace("XXXX", directions));

            await Step05_GoodbyeUser(context, null);
        }

        public async Task Step05_GoodbyeUser(IDialogContext context, IAwaitable<IMessageActivity> result)
        {
            await context.PostAsync(
                StorageDataAccess.GetBotMessage("GoodByeUserMessage"));

            context.Wait(Step01_GreetUserDisplayIntentions);
        }
    }
}
Another way of implementing the same logic can be done using Microsoft’s Bot Framework FormFlows.
Step 6: Register the Bot
Since we are done with building our bot, next step would be to register it. To start the registration process navigate to this URL: https://dev.botframework.com/bots/new.
Remember: Your bot will not be published to the Directory and available for the public until your intentionally publish it.
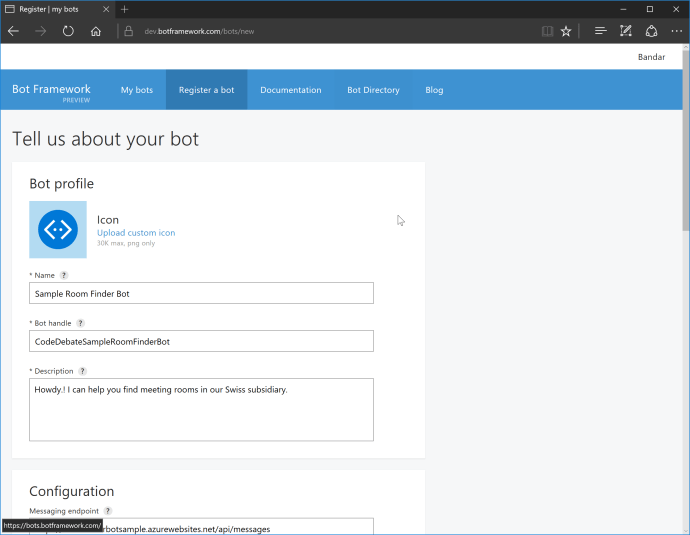
Register New Bot
With regards to the Messaging Endpoint, add to your bot’s URL /api/messages. This where your MessagesController is located.
During the registration of a new bot, a password will be generated for secure access to the Bot State Service. Make sure you paste it somewhere secure as we will need it to configure the bot later. You can learn more about authentication here: Bot Framework Authentication.
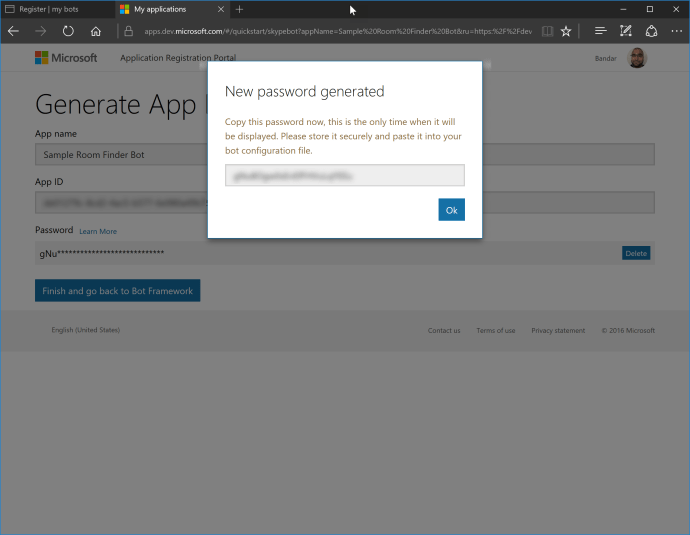
Bot App Password
Once you finish, you will be redirected to the My Bots page. See screenshot below.
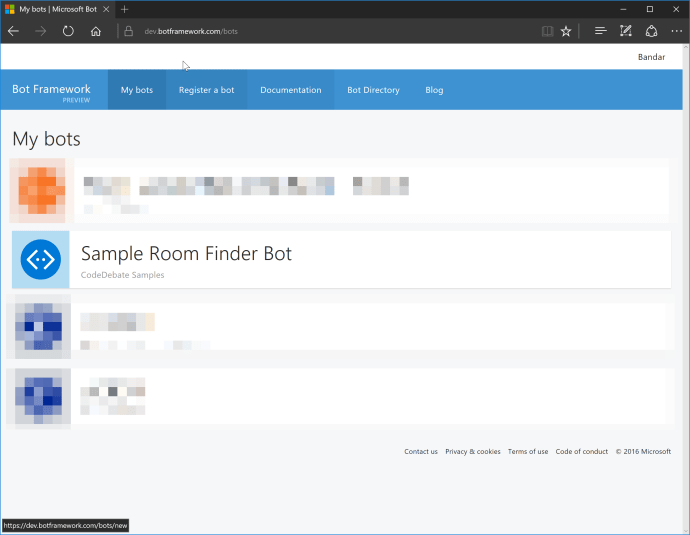
My Bots Page
Step 7: Update Azure Web App Application Settings
As we are done with the registration, we have to update our bot’s deployment. To do so, navigate to the Application Settings blade and make sure you have the following keys: StorageConnectionString, BotId, MicrosoftAppId, and MicrosoftAppPassword are created and have the correct values.
- StorageConnectionString: used to access the Azure Table Storage. Refer to Connection Strings website for Azure Storage to create the connection string. You will need the Storage Account Name and one of the Access Keys.
- BotId: this is the Bot Handle you used during the bot registration.
- MicrosoftAppId and MicrosoftAppPassword: both were created during the bot registration.
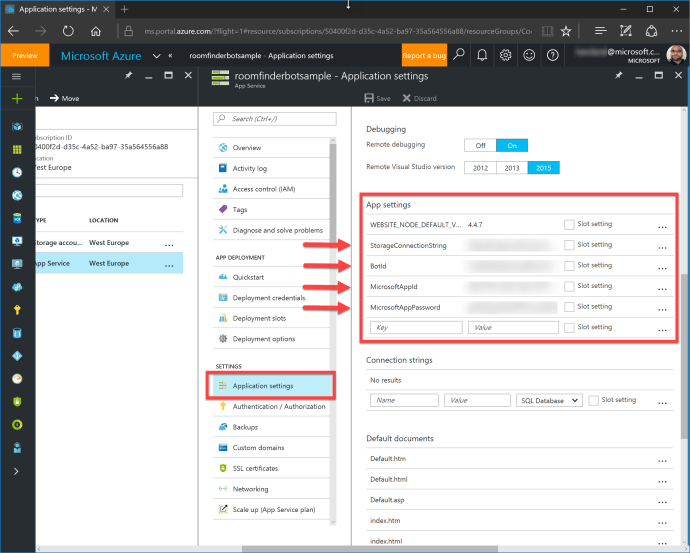
Web App Application Settings
Step 8: Test our bot using Skype
Out of the box, Microsoft’s Bot Framework creates two channels: Skype and Web Chat. Web Chat is an IFRAME that you can embed in a web page or a web view. Since we did not publish our bot, we won’t be able to find it in Skype’s bots directory, therefore we have to add it manually.
Navigate to your bot’s details page and click on Add to Skype.
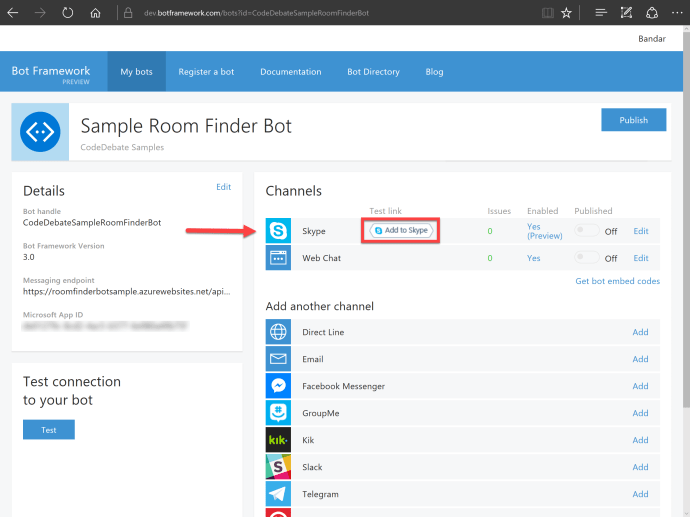
Bot Details & Add to Skype
This will open a new tab in your browser. You can share the tab’s URL with your testers. Now click on Add to Contacts. This will launch your default Skype client and add the bot to your list of contacts.
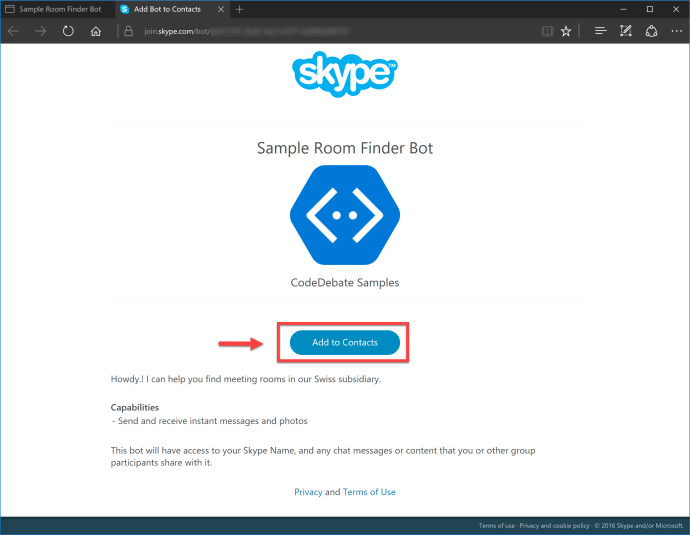
Add Bot to Contacts List
As you can see from the below screenshot, I am using the Skype Preview. Since I am an expat, I have a huge list of contacts from back home 🙂 Therefore, I just went to my Contacts list and searched for Room Finder to find our bot.
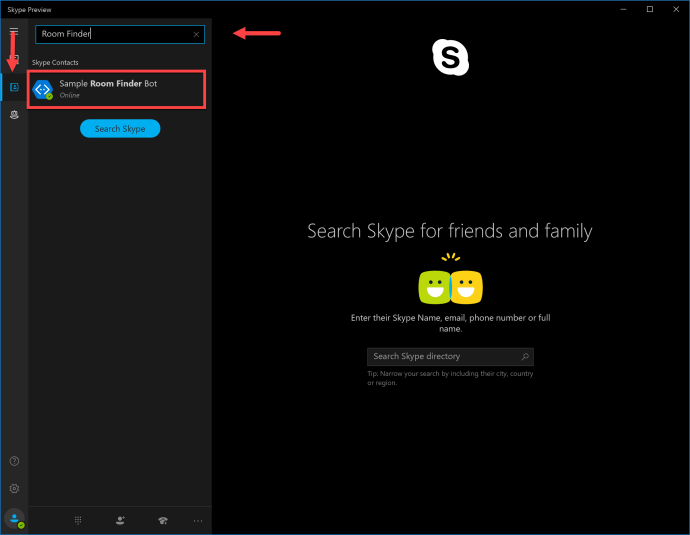
Search for the Sample Bot in your Contacts List
I captured my test round with our bot in the below screenshot. Notice how Skype automatically converted our Bot Framework Dialog Choice Options into actual buttons, so I do not have to type them in.
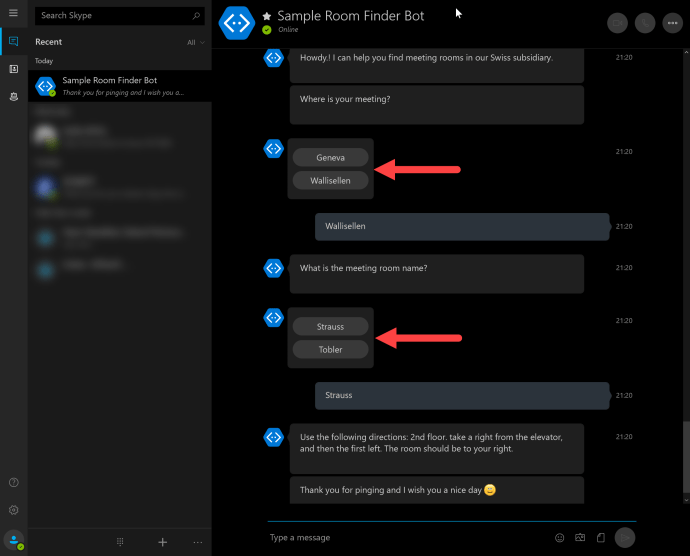
See the bot in Action
So what’s next?
If you liked building this simple bot, I really recommend watching the: Building a Conversational Bot: From 0 to 60 session recording. Both Dan Driscoll and Mike Hall will walk you through the inner-workings of the framework and build a bot using Cognitive Services LUIS API.
