As we nurture our culture in Microsoft, we are encouraged to embrace the growth mindset. We are better together, especially when fostering an inclusive and diverse environment. Constructive feedback is key to help you and your colleagues to grow. Today’s post is about adding another tool to your constructive feedback mission.
In this post, we will build an application level add-in, and deploy it to Outlook using Microsoft Visual Studio Tools for Office (VSTO). The add-in will use Microsoft Cognitive Services Text Analytics API to analyze the sentiment of your email contents, and give you feedback.
You can find the source code of our sample on GitHub: https://github.com/codedebate/Samples-ConstructiveFeedbackAddIn.
Step 1: Let’s agree on the scope of our sample
Honestly, it took me a while to agree on a direction. Should the add-in analyze automatically the sentiment of every email using machine learning? or should it be reactive, where users will have to consult it?
When its about user experience, automatically scanning every email the user sends makes a lot of sense, yet requires lots of maintenance e.g. anonymization list to remove all keywords that might indicate your identity like company names, products, and even people before consulting Microsoft Cognitive Services Text Analytics API. In addition, the need of the user consent, privacy, etc.
To ease the pace, we will host our logic inside an Office Ribbon button to be invoked re-actively upon the user’s wish.
Being hosted within the same process, application level add-ins should be thin aka most if not all the logic processing should happen externally. Therefore, we will create an ASP.NET Web API and deploy it to an Azure Web App. When invoked, the add-in will send a POST action to the API with the content of the email. Upon receiving the response, it will display a message with the detected sentiment.
The below screenshots describe the add-in in action. Notice that I used the sentiment visuals from Twemoji on Git Hub and WordPress Emoji Everywhere. Twitter open sourced and published them on Git Hub. Thank you Twitter 🙂
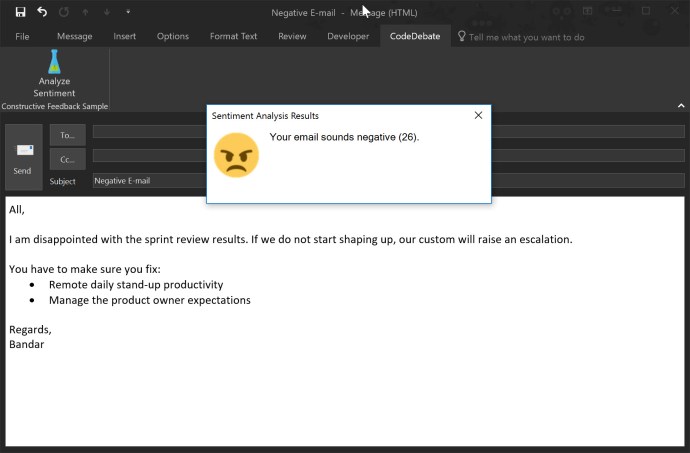
Add-in in action with a negative sentiment feedback
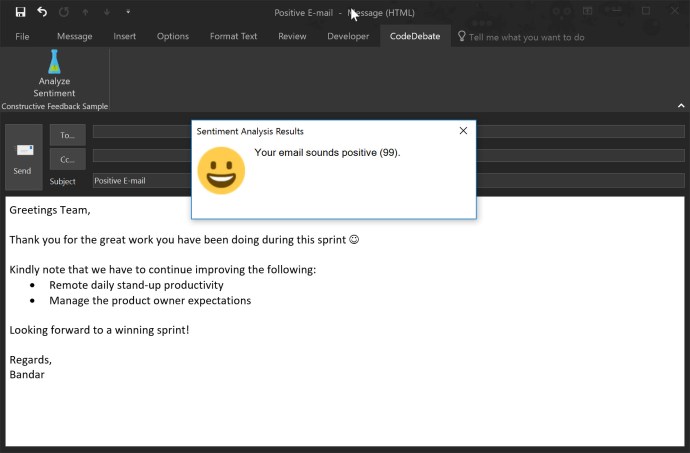
Add-in with a positive sentiment feedback
Step 2: Provision required Azure resources for the solution
Login in to your subscription using the Azure portal, and create a new Resource Group. I called mine CodeDebate-ConstructiveFeedbackAddIn. When done, create a new Web App to host our API and a Cognitive Services Text Analytics API resource. I called them both constructivefeedbackaddin.
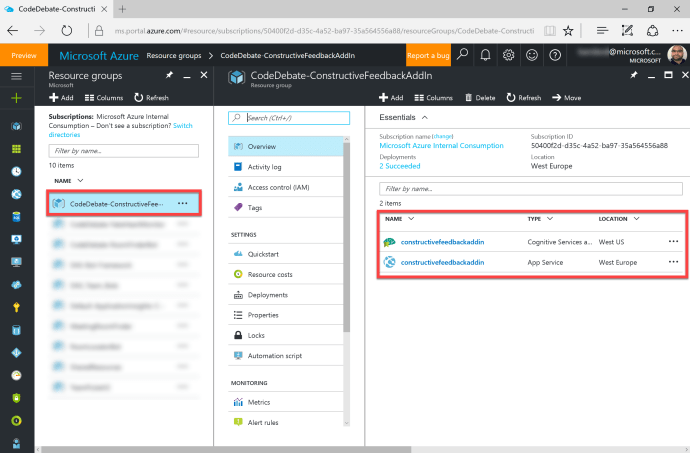
Constructive Feedback Add-In Resource Group
Make sure to take note of the Cognitive Services Text Analytics API Account Key.
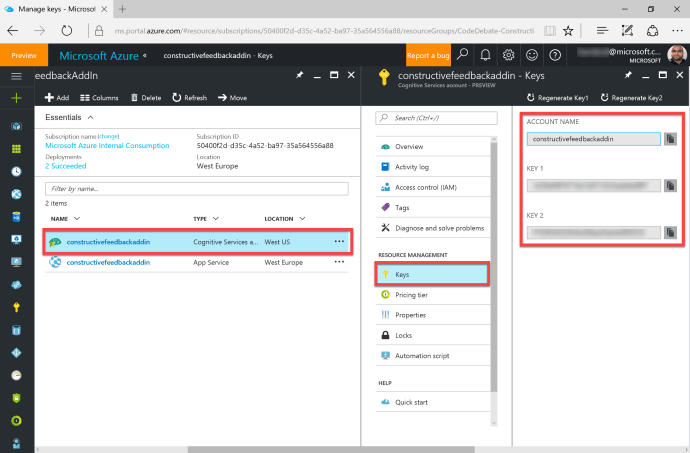
Text Analytics API: Account Name and Key
Step 3: Build the ASP.NET Web API and connect it to Cognitive Services Text Analytics API
Launch Microsoft Visual Studio and create a new ASP.NET Web API. The API will have one Controller with a POST action. It will receive the email content from the add-in, relay it to Cognitive Services Text Analytics API, and send the sentiment analysis feedback afterwards to the add-in.
using CodeDebate.Samples.ConstructiveFeedback.Api.Models;
using Newtonsoft.Json;
using System;
using System.Configuration;
using System.Net;
using System.Net.Http;
using System.Net.Http.Headers;
using System.Text;
using System.Threading.Tasks;
using System.Web.Http;
namespace CodeDebate.Samples.ConstructiveFeedback.Api.Controllers
{
public class SentimentFeedbackController : ApiController
{
public async Task<HttpResponseMessage> Post(HttpRequestMessage request)
{
var response =
new HttpResponseMessage();
var sentimentAnalysisFeedback =
new SentimentAnalysisFeedback();
try
{
var addInRequest =
request.Content.ReadAsStringAsync().Result;
var sentimentAnalysisRequest =
JsonConvert.DeserializeObject<SentimentAnalysisRequest>(addInRequest);
var client =
new HttpClient
{
BaseAddress =
new Uri(ConfigurationManager.AppSettings["CSTAAPI-BaseUrl"])
};
client.DefaultRequestHeaders.Add(
"Ocp-Apim-Subscription-Key",
ConfigurationManager.AppSettings["CSTAAPI-Key"]);
client.DefaultRequestHeaders.Accept.Add(
new MediaTypeWithQualityHeaderValue("application/json"));
var byteData =
Encoding.UTF8.GetBytes(
"{\"documents\":[{\"id\":\"1\",\"text\":\"" +
sentimentAnalysisRequest.EmailContent +
"\"},]}");
var uri = "text/analytics/v2.0/sentiment";
var content = new ByteArrayContent(byteData);
content.Headers.ContentType = new MediaTypeHeaderValue("application/json");
var csResponse = await client.PostAsync(uri, content);
var sentimentResponse = await csResponse.Content.ReadAsStringAsync();
var sentiment = JsonConvert.DeserializeObject<RootObject>(sentimentResponse);
if (sentiment.Documents[0] != null)
{
sentimentAnalysisFeedback.Score =
(int) (sentiment.Documents[0].Score * 100);
}
else
{
sentimentAnalysisFeedback.Score = -1;
}
if (sentimentAnalysisFeedback.Score < 0) { sentimentAnalysisFeedback.Description = ConfigurationManager.AppSettings["Invalid-Description"]; sentimentAnalysisFeedback.VisualUri = ConfigurationManager.AppSettings["Invalid-VisualUri"]; } else if( sentimentAnalysisFeedback.Score > 0
&& sentimentAnalysisFeedback.Score < 35) { sentimentAnalysisFeedback.Description = ConfigurationManager.AppSettings["Low-Description"]; sentimentAnalysisFeedback.VisualUri = ConfigurationManager.AppSettings["Low-VisualUri"]; } else if ( sentimentAnalysisFeedback.Score > 35
&& sentimentAnalysisFeedback.Score < 70) { sentimentAnalysisFeedback.Description = ConfigurationManager.AppSettings["Meduim-Description"]; sentimentAnalysisFeedback.VisualUri = ConfigurationManager.AppSettings["Meduim-VisualUri"]; } else if (sentimentAnalysisFeedback.Score > 70)
{
sentimentAnalysisFeedback.Description = ConfigurationManager.AppSettings["High-Description"];
sentimentAnalysisFeedback.VisualUri = ConfigurationManager.AppSettings["High-VisualUri"];
}
response.StatusCode = HttpStatusCode.OK;
response.Content =
new StringContent(JsonConvert.SerializeObject(sentimentAnalysisFeedback));
}
catch (Exception ex)
{
response.StatusCode = HttpStatusCode.BadRequest;
response.Content = new StringContent(ex.ToString());
}
return response;
}
}
}
Looking at the previous code snippet, we are using two models SentimentAnalysisRequest and SentimentAnalysisFeedback as follows:
- Sentiment Analysis Request: used by the add-in to include email content, among additional information to our API
- Sentiment Analysis Feedback: used by our API to describe the analysis feedback. In this model, we will return a description text as well as a URI to a sentiment visual e.g. emoticon. The add-in will use this information and bind it to a dialog box.
In addition, you will find two more classes, Document and RootObject. We will use them to serialize the response back from Cognitive Services.
namespace CodeDebate.Samples.ConstructiveFeedback.Api.Models
{
    public class SentimentAnalysisRequest
    {
        public string EmailContent { get; set; }

        public SentimentAnalysisRequest() { }
    }
}
namespace CodeDebate.Samples.ConstructiveFeedback.Api.Models
{
    public class SentimentAnalysisFeedback
    {
        public int Score { get; set; }
        public string Description { get; set; }
        public string VisualUri { get; set; }

        public SentimentAnalysisFeedback() { }
    }
}
namespace CodeDebate.Samples.ConstructiveFeedback.Api.Models
{
    public class Document
    {
        public double Score { get; set; }
        public string Id { get; set; }
    }
}
using System.Collections.Generic;

namespace CodeDebate.Samples.ConstructiveFeedback.Api.Models
{
    public class RootObject
    {
        public List<Document> Documents { get; set; }
        public List<object> Errors { get; set; }
    }
}
Step 4: Build the application level add-in and deploy to Outlook
Since we are done with the heavy lifting, built, and deployed the API. Next we have to build the add-in. Launch Visual Studio and this time create an Outlook 2013 and 2016 VSTO Add-In.
Add a new Ribbon to our add-in project. Select the “Ribbon (Visual Designer)” template.
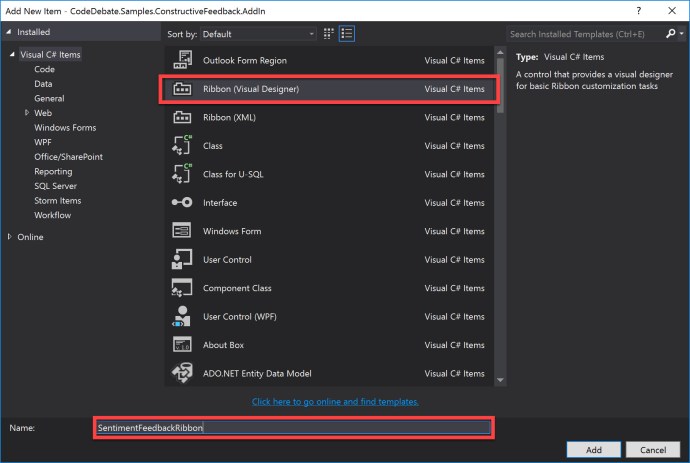
Adding a new Ribbon with Visual Designer support
After customizing the layout of the Ribbon, it looks like the below screenshot. I just added one Button to the Group. The Button will launch the Sentiment Analysis Results dialog.
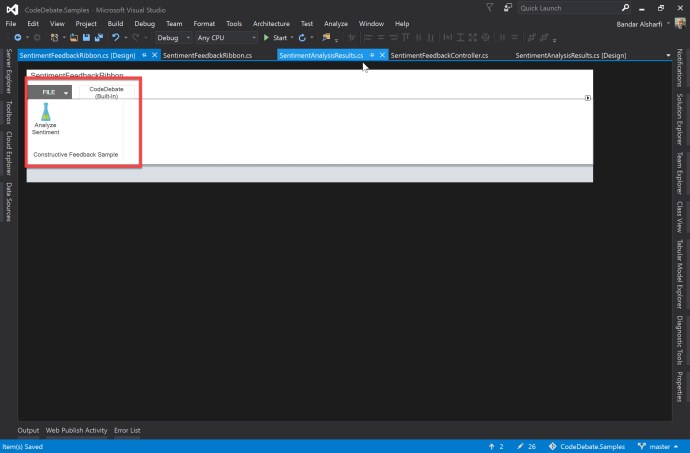
Customizing the Sentiment Feedback Ribbon layout
Now add a new Windows Forms form to the add-in project. I have customized its layout like the below screenshot. An Image control to the left that displays the feedback sentiment visual and a Label to the right to display both Sentiment description and score.
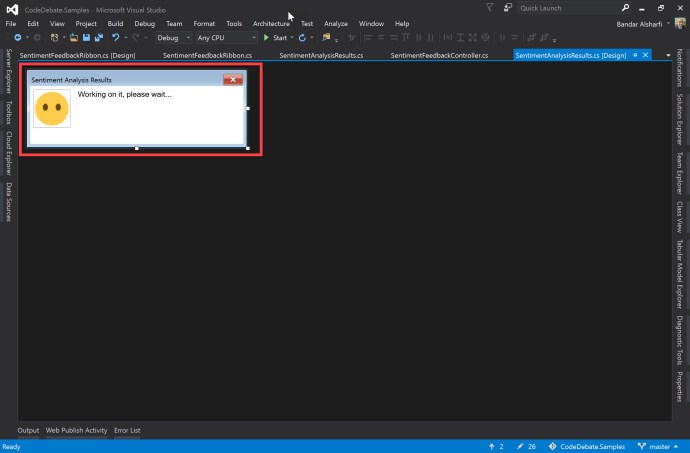
Customizing the Sentiment Analysis Results form
When the form is done loading, it will call our API with the email contents and render back the sentiment analysis results.
Below are the source code snippets for both the Ribbon and the Windows Forms form.
using Microsoft.Office.Tools.Ribbon;

namespace CodeDebate.Samples.ConstructiveFeedback.AddIn
{
    public partial class SentimentFeedbackRibbon
    {
        private void SentimentFeedbackRibbon_Load(object sender, RibbonUIEventArgs e)
        {

        }

        private void AnalyizeSentimentButton_Click(object sender, RibbonControlEventArgs e)
        {
            var form = new SentimentAnalysisResults();
            form.ShowDialog();
        }
    }
}
using Microsoft.Office.Interop.Outlook;
using Newtonsoft.Json;
using System;
using System.Net.Http;
using System.Windows.Forms;

namespace CodeDebate.Samples.ConstructiveFeedback.AddIn
{
    public partial class SentimentAnalysisResults : Form
    {
        public SentimentAnalysisResults()
        {
            InitializeComponent();
        }

        private void SentimentAnalysisResults_Load(object sender, EventArgs e)
        {
            var apiHttpClient = new HttpClient();
            var consutrictiveFeedbackApiUri = "https://constructivefeedbackaddin.azurewebsites.net/api/sentimentfeedback";
            var feedbackRequest = new SentimentAnalysisRequest();

            try
            {
                Inspector inspector = Globals.ThisAddIn.Application.ActiveInspector();
                if (inspector != null)
                {
                    if (inspector.CurrentItem != null)
                    {
                        if (inspector.CurrentItem is MailItem)
                        {
                            var mailItem = (MailItem)inspector.CurrentItem;
                            feedbackRequest.EmailContent = mailItem.Body;
                        }
                    }
                }

                    var response =
                        apiHttpClient.PostAsync(consutrictiveFeedbackApiUri,
                        new StringContent(
                            JsonConvert.SerializeObject(
                                feedbackRequest))).Result;

                    if (response.IsSuccessStatusCode)
                    {
                        var sentimentFeedbackString =
                            response.Content.ReadAsStringAsync().Result;

                        var sentimentFeedback =
                            JsonConvert.DeserializeObject<SentimentAnalysisFeedback>(sentimentFeedbackString);

                        SentimentDescription.Text =
                            string.Format("{0} ({1}).",
                            sentimentFeedback.Description,
                            sentimentFeedback.Score.ToString());

                        SentimentVisual.ImageLocation = sentimentFeedback.VisualUri;
                    }
                    else
                    {
                        SentimentDescription.Text =
                            string.Format(
                                "Opps.! Something went wrong in the Web API: {0} \n- Web API status code: {1}",
                                response.Content.ReadAsStringAsync(),
                                response.StatusCode);
                    }
            }
            catch (System.Exception ex)
            {
                SentimentDescription.Text =
                    string.Format(
                        "Opps.! Something went wrong: {0}", ex.ToString());
            }
        }
    }
}
Notice:
- I copied and pasted both models SentimentAnalysisRequest and SentimentAnalysisFeedback from the API project into the add-in. If you change the model, make sure you sync your updates between both projects.
- You can either use ClickOnce deployment or Visual Studio to deploy the add-in to Outlook.
- Since we used Visual Studio Tools for Office (VSTO), the add-in will only work for Outlook 2013 and 2016.
So what’s next?
Communication using email is how most of us today interact with our colleagues, partners, and customers. While in-person feedback can relay sense of care, email unfortunately lacks the reflection of real sentiment and will confuse people receiving constructive feedback.
If you think about taking this add-in to the next level, I suggest the below:
- Consider re-writing the add-in using Microsoft Apps for Office instead of Visual Studio Tools for Office (VSTO). With the new model, the logic will be accessible from Outlook Web Access, Mac, and Windows. Furthermore, you can use HTML5 & JavaScript, and roll-out updates without the need of a client deployment process. Finally, you can even sell it using the Microsoft Office Store.
- You will have to work around removing any Personally Identifiable Information (PII), employer, customer, and partner information when processing sentiment analysis. An anonymization list can be very useful. Users can specify the names, and add-in should replace them automatically with something fake like “Contoso“.
